
Security and efficiency are paramount for organizations of all sizes. Microsoft’s Entra ID is a versatile and robust identity and access management solution designed to meet the needs of modern businesses of all sizes. Whether you’re using the Free tier or the premium P2 license, optimizing your Entra ID setup is crucial to harness its full potential and safeguard your organization’s digital assets.
In this blog post, we will delve into the five must-do settings that you need to change in your Entra ID configuration. These settings will enhance your security posture, streamline access management, and ensure compliance across your organization. By implementing these recommendations, you’ll be well on your way to a more secure, efficient, and compliant Entra ID environment, regardless of your subscription tier.
Security Defaults or Conditional Access
Conditional Access is ideal for organizations with more complex security requirements and those using Entra ID P1 or P2 license but for Entra ID Basic or Free tier we have Security Defaults so let’s start with Security Defaults which provide a baseline level of security for your organization.

They are automatically enabled for new tenants and include essential protections like:
- Multifactor Authentication (MFA): Ensures that all users register for MFA, adding an extra layer of security.
- Blocking Legacy Authentication: Prevents the use of outdated and less secure authentication methods.
- Protecting Privileged Activities: Ensures that critical actions, such as accessing the Azure portal, require additional verification.
When we are moving up to Entra ID P1 or P2 we should move away from Security Defaults and should migrate over to Conditional Access which takes security a step further by allowing you to create granular policies based on various signals, such as user location, device compliance, and risk levels. With Conditional Access, you can:
- Enforce MFA: Require MFA for accessing sensitive applications or services.
- Restrict Access Based on Location: Limit access to trusted IP address ranges or specific regions.
- Monitor and Control Access: Use real-time risk detection to identify and respond to suspicious activities.
Access management for Azure resources
Access management for Azure resources gives global administrators the ability to gain User Access Administrator access to absolutely all Azure Subscriptions. This feature is super helpful for managing the environment as a “super admin” but even if you are using PIM and this setting is set to “Yes” then you will be always granted active User Access Admin to all subscription on a Tenant Root level. So, it’s a useful setting but remember to toggle it off whenever the access is not needed.

We can find this setting in the Entra Admin Center under “Identity” -> “Overview” -> “Properties”
Guest User Access
This setting determines whether guests have full access to enumerate all users and group memberships (most inclusive), limited access to other users and memberships, or no access to other users and group memberships including groups they are a member of (most restrictive).
By default, tenants are configured to let “Guests can see membership of all non-hidden groups” – you as an admin should considure to change this setting to a more restrictive setting witch will hide all attributes so that guests can`t see any membership of any groups in the tenant.

Default user role permissions
While we are at the “User Settings” pane in Entra ID we need to have a look on the controls of regular users within our tenant as well.
There are several controlls here that we should consider switch to “No”
The three settings that we have her (as of february 2025)
- Users can register applications
- Restrict non-admin users from creating tenants
- Users can create security groups
The default setting on all these are “Yes” – and two of them are quite easy to understand what it does – but the “Creating teanants” setting, what is that actually?
Well, by default – all users can create new Microsoft Tenants from their own basic-user, and the tenants they then make will be a full blown Microsoft Tenant with Microsoft Entra and all settings setup. This user will also be a Global Administrator of the new teannt. There is no way of other users to “take-over” this tenant, so it makes sense that users in most scenarios should not be able to create new tenants.
So! all these settings should be set to “No” and end-users should order new applications or groups and even tenants if they need it.
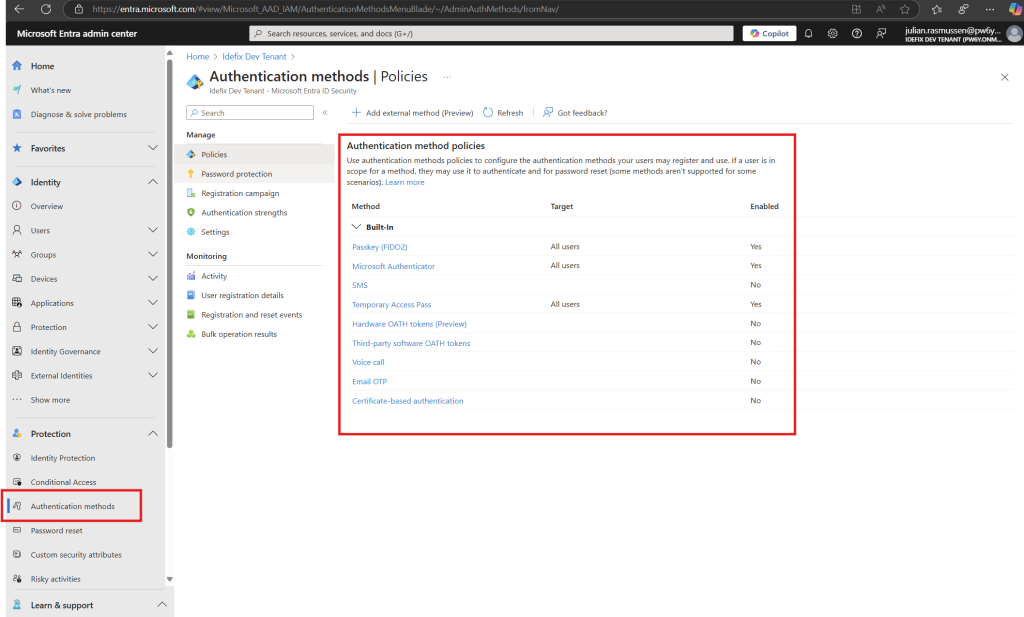
Authentication Methods
Last must do setting is the Authentication Methods in the Entra ID Admin Center. You find it under the “Protection” section in the left-pane menu.
What we need to do here is to go through the settings that are set and disable all Authentication methods that we are not to use or support within our environment.
So my recomendations here is to first of all Enable “Passkeys (FIDO2)” in your environment so that you can start rollout of phishing resistant multi-factor authentication to your users. Within this users can use a physical FIDO2 device or take advantage of passkeys in Microsoft Authenticator witch works verry well!
Second! we must deactivate the methods that we are not to support. I would recomend removeing SMS, Voice and Email OTP at least as these are methods that are “Easier” to manipulate from a attackers point of view.
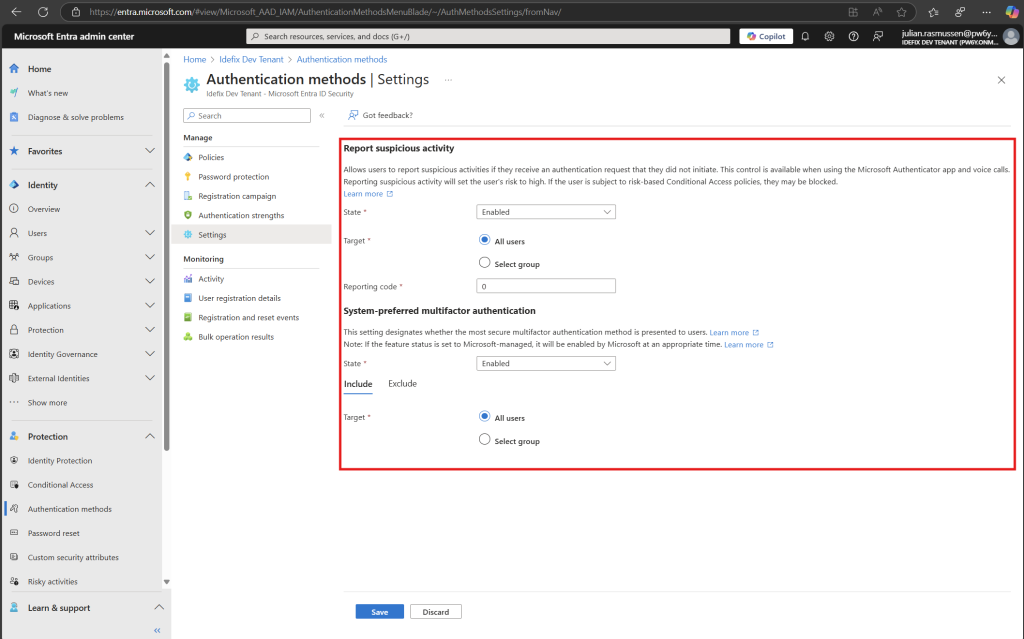
As a little bonus here – please also head in to “Settings” under Authentication methods and enable the two settings we have there.
“Report suspicious activity” and “System-preferred multifactor authentication”. The last one here will make use of the strongest registred MFA method for users when they are authenticating – they can of course select other methods, but by default they will use the strongest one that’s registred.
Conclution
In conclusion, optimizing your Microsoft Entra ID settings is an essential step towards building a secure and efficient identity and access management infrastructure. By implementing the recommended changes, such as enabling Multifactor Authentication, leveraging Conditional Access, and fine-tuning user and guest access controls, you can significantly enhance your organization’s security posture and ensure compliance with industry standards.
Remember, these settings are not just about following best practices; they are about proactively defending your digital assets from ever-evolving threats. Whether you’re operating on the Free tier or a premium P2 license, these adjustments will provide you with the necessary tools to safeguard your organization’s resources effectively.
As you continue to navigate the complexities of identity and access management, keep these key settings in mind and regularly review your configurations to stay ahead of potential risks. By doing so, you’ll create a robust and resilient Entra ID environment that can adapt to the changing security landscape and support your organization’s growth and success.