

Introduction
I think every organization want to avoid the nightmare of loosing some or all company owned data. And when we see AI services like Microsoft 365 Copilot incomming it`s even more important to have a good data hygiene on all of your data.
Data loss can be devided into several inidents like destroyed, deleted or theft wher data is copied outside of your organizational bounderies.
Data can be stolen in different ways like loss of laptop / stolen hardware, account inflitration or an employee that copies data out from their machine or cloud service.

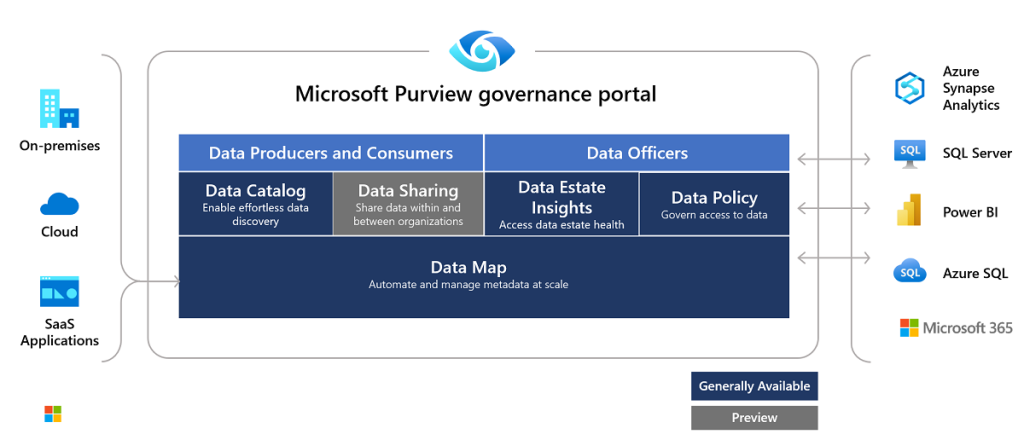
We have several methods of protecting our self against this and one of them are “Data loss protection policies” within Microsoft Purview.
Data loss prevention is just one of the Microsoft Purview services that you can use to protect your sensitive items wherever they are stored.
To help protect organizations sensitive data and reduce risk of lossing data like financial, properietary, credit card numbers and so on they need a way to prevent their users from inappropriately sharing it with people that should not have access to this data, this can also be sharing it to your selv by moving the data from the organization to your own storage like a USB flash drive or a personal cloud storage. Thos practice is called Data loss prevention or DLP in short.
With Microsoft Purview we can implement data loss prevention by defining and applying a Data loss protection policy. The policy will then identify, monitor and automatically protect sensitive information stored in items across all of these services:
- Microsoft 365 services such as Teams, Exchange, SharePoint, and OneDrive accounts
- Office applications such as Word, Excel, and PowerPoint
- Windows 10, Windows 11, and macOS (three latest released versions) endpoints
- non-Microsoft cloud apps
- on-premises file shares and on-premises SharePoint
- Power BI
DLP detects sensitive items by using deep content analysis, not by just a simple text scan. Content is analyzed for primary data matches to keywords, by the evaluation of regular expressions, by internal function validation, and by secondary data matches that are in proximity to the primary data match. Beyond that DLP also uses machine learning algorithms and other methods to detect content that matches your DLP policies.
What do we need to get started with DLP?
That`s a good question! And heres what you need to think about BEFORE starting your journey with creating and managing your data with Data loss prevention policies
Prepare for DLP
Each of the services that’s supported to use within DLP has different prerequisites so planning is key. Start with one service like for example Exchange online witch is nativly supported out of the box. but if you where to start with on-premises fileshares then theres a need of Azure Information Protection scanner installed – with all the preparations that needs. Also remember to test the policies thoroughly before you activate any blocking actions.
Design your policies
Start by defining your control objectives, and how they apply across each workload thats supported. Draft a policy that includes your objectives. You can start with one workload at a time, or across all available workloads – there’s no impact yet.
Implement policy in test mode
Evaluate the impact of the controls by implementing them with a DLP policy in test mode. Actions defined in a policy aren’t applied while the policy is in test mode. It’s ok to apply the policy to all workloads in test mode, so that you can get the full overview of results, but you can start with one only workload if you need to.
Monitor outcomes and fine-tune the policy
While in test mode, monitor the outcomes of the policy and fine-tune it so that it meets your control objectives while ensuring you aren’t adversely or inadvertently impacting valid user workflows and productivity. Here are some examples of things to fine-tune:
- adjusting the locations and people/places that are in or out of scope
- tune the conditions that are used to determine if an item and what is being done with it matches the policy
- the sensitive information definition/s
- add new controls
- add new people
- add new restricted apps
- add new restricted sites
Enable the control and tune your policies
Once the policy meets all your objectives, turn it on and wait 1 hour. Continue to monitor the outcomes of the policy application and tune as needed.
Wrap-up
With these five steps you are ready to implement and start testing Data loss prevention on your data. Greate! What does this cost? – wel, in order to use DLP policies you need to be on a Microsoft 365 E3 or E5 license or Office 365 E3 or E5 SKU on your end-users.
For Microsoft 365 Business Standard and Premium customers you can buy an addon called “Office 365 data loss prevention add-on”.
From this blog-post we see that starting the data protection strategy on our data is realy important and of course extremly important to do before adopting services like Microsoft 365 Copilot – and, we have often seen on data protection as a really hard task – but it’s actually not that hard to start the task with small controls and focused on a group of people.


One Comment
Comments are closed.